4 minutes
WSL Over Powershell
The Problem
Most of the time, when writing code, I can be found with my MacBook. I prefer Mac OS for development work as it is, in my opinion, the perfect balance between performance and usability. Mac OS does a great job of providing the power of Linux with the simplicity and elegance expected when using an Apple product. I know that statement is blasphemous to some, but it is what works for me.
I have used many machines over my lifetime beginning with an IBM 386 back in the 1990’s 👴. I have had a Dell desktop, many Apple laptops, an IBM laptop (when Thinkpad was an IBM brand and not a Lenovo one), and have built two different desktop PCs for gaming (both Intel and AMD based).
Current Setup
- Custom PC - AMD Ryzen 7 5800X3D - Nvidia 2080Ti - 32GB RAM - Windows 11
- Macbook Pro 16" - M1 Max - 32GB RAM
- Dell XPS 13 - Intel i7 (10th Gen) - 16GM RAM - Pop!_OS
I mostly use the desktop for gaming, but I occasionally find myself working on a side project with it as well. The problem arises when using this machine for these separate purposes. I like to keep it clean with a minimal amount of software installed and setting up a development environment can quickly require a lot of software packages. Originally, I viewed this as a chance to learn a little Powershell since I have been so used to Bash and ZSH. I quickly regretted this…
Powershell to WSL 2
Let’s be clear: I am not knocking on Powershell in general. I am sure it is an incredibly powerful shell for what it is built for and for people that are used to it. I quickly found myself having to dig through pages of documentation and googling everything to do simple tasks like create aliases and recursively work with directories. Almost immediately, I longed for what I knew best: my Linux and Mac terminals.
To be fair, I did get a working development environment going for my small Go side projects. It is not as if is was not functional, I simply found working with it to be annoying. So I decided to try a very cool feature: Windows Subsystem for Linux (WSL). The second version of WSL (WSL2) is very well done and easy to use.
Installation
Installing WSL is incredibly straighforward. Simply run the Windows Terminal application as an administrator and use the wsl commands.
First, find which Linux distro you wish to install. You can see the list of available distros via the wsl -l -o command. Then, install the distro of your choice (I chose Ubuntu) with the command: wsl --install Ubuntu.
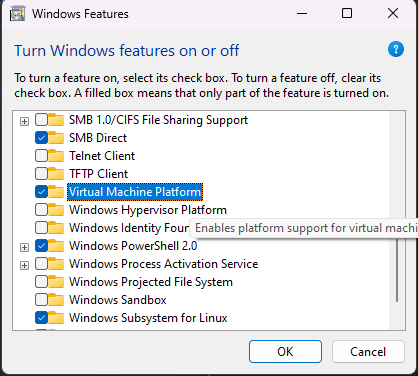
Tip: Before installation, be sure you have virtualization enabled in both Windows features and in your BIOS.

After installation, starting the VM is as simple as starting an Ubuntu terminal session or even opening up VSCode to a directory within the WSL filesystem.

From there, WSL behaves exactly like any other Linux virtual machine. I am able to use all of the tooling I am used to with other *nix operating systems right within my Windows 11 desktop environment. And, for performance, it is super easy to turn off and on when I need it.
Upgrading the Ubuntu Version
By default, WSL will install the latest LTS version of Ubuntu (22.04.2 at the time of this writing). I wanted to run the latest version: 23.04. To do this, I simply had to boot up the WSL Ubuntu VM and run the following commands:
sudo apt update
sudo apt upgrade
sudo sed -i 's/lts/normal/g' /etc/update-manager/release-upgrades
sudo sed -i 's/jammy/lunar/g' /etc/apt/sources.list
sudo apt dist-upgrade
Then, validate it by checking the version installed with lsb_release -a or using a tool like neofetch.
WSL Commands to Remember
- Check WSL version
wsl --version
- List available distros for installation
wsl --list --online
- Install desired distro
wsl --install Ubuntu
- Check VM status
wsl --status
- Shutdown VM
wsl --shutdown
- Terminate VM
wsl -t Ubuntu
IDE Setup
For the most part, IDEs running within Windows 11 interact smoothly with the WSL filesystem. VSCode does this seamlessly (and as mentioned above, it will even start the WSL VM if you access a project in that filesystem 😁). GoLand required a little more setup, but mostly just to tell the IDE to use the WSL distro as a run target. JetBrains provides easy documentation for how to do this.
Wrap-up
In conclusion, the setup of WSL is extremely easy and powerful. Gone are the days where performance issues arise simply by working on projects in the WSL filesystem from IDEs running on Windows. The environment is fast, clean, and dead simple to use.